This simple project talks you through the process of fitting a recessed fire extinguisher in your caravan…
When you’re purchasing a fire extinguisher for your van, the Caravan and Motorhome Club recommends a 1kg AFFF device complying with BS EN 3 and rated at least 5A.
This is bulky and while it does have to be instantly accessible, you don’t want to keep bumping into it. My solution is to recess the device into a cupboard, in an open-front plywood box.
I used some offcuts of 8mm ply to provide rigidity without adding excessive weight.
Measure and cut
First, measure the extinguisher and cut out the plywood sides, back and base. You can then clamp these pieces together temporarily to check the size.
Remember to allow for the angle trims that fit around the opening. These could be made from hardwood or aluminium (which is much thinner).
Bond the pieces together using PVA wood glue and clamp them overnight. Make sure you leave the roof of the box off at this stage, and leave some extra length, as it’s best to cut the
top section off at 45 degrees for easier access.
Trim and sand the box, then position it against the wall to mark where your oblong access hole needs to be cut. This hole has to be a short distance from obstructions, to allow clearance for the jigsaw’s baseplate. Any shelves might also need to be temporarily removed.
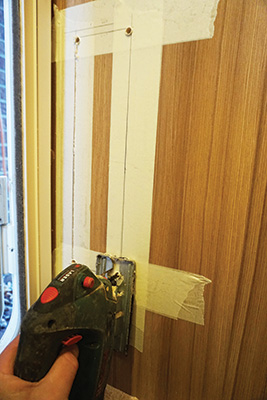
To protect the surface from the jigsaw, apply a double layer of wide masking tape to the outside of the cupboard. Then measure inside and out, and mark the hole on the outside
for cutting. Double-check your markings and drill a hole in each corner to allow access for the jigsaw blade. Be sure to hold the base plate firmly against the surface, and don’t lift it
until the motor is at rest.
Once you’ve cut your oblong out of the cupboard side, use a file to true up the corners and remove any bumps. Small imperfections won’t matter, because the edges are going
to be covered by the trims.
Your box is now ready to be varnished both inside and out, but remember to leave the mating edge bare – that will help the glue to hold better. Placing temporary plastic fingers along the edge of the hole will help you to position your box in the right place.
Don’t rely just on adhesive to attach the box. Use long, thin screws from the front into the edge, so the heads are covered by the trims. PVA won’t stick well to non-porous surfaces,
so for PVC wood-effect finishes, use a cartridge adhesive – and test it first on a ply offcut.
A mitre power saw is ideal for cutting timber or aluminium angles, which can also be fixed using the adhesive.
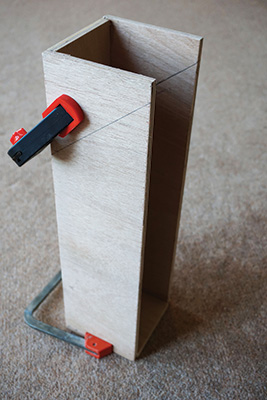
1 Glue the recessed box with PVA wood glue and clamp overnight. At this stage, upper section has not yet been cut.
2 Mark access hole in cupboard side on masking tape and drill a hole in each corner. When cutting, always keep jigsaw baseplate firmly against surface.
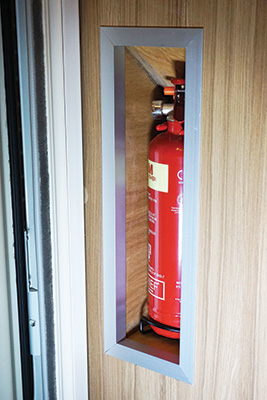
3 The completed project, after fitting 20mm x 20mm of anodised aluminium angle.
After more great DIY inspiration like this fitting a recessed fire extinguisher tutorial? Then head to our Back to Basics: DIY & Maintenance category, where you’ll find some brilliant projects and ideas to try out.
Future Publishing Limited, the publisher of practicalcaravan.com, provides the information in this article in good faith and makes no representation as to its completeness or accuracy. Individuals carrying out the instructions do so at their own risk and must exercise their independent judgement in determining the appropriateness of the advice to their circumstances. Individuals should take appropriate safety precautions and be aware of the risk of electrocution when dealing with electrical products. To the fullest extent permitted by law, neither Future nor its employees or agents shall have any liability in connection with the use of this information. You should check that any van warranty will not be affected before proceeding with DIY projects.
If you’ve enjoyed reading this article, why not get the latest news, reviews and features delivered direct to your door or inbox every month. Take advantage of our brilliant Practical Caravan magazine SUBSCRIBERS’ OFFER and SIGN UP TO OUR NEWSLETTER for regular weekly updates on all things caravan related