


WITH JUST A week to go until Mrs Donnelly and I set off to Croatia in the Sprite, the list of work required to get it ready for the road was a little lengthier than either of us would have liked. The biggest was definitely a repair to the rear nearside. Water ingress had led to grab handle falling off. Bigger screws and an army size tube of silicone is the usual answer, but something told me there was not a lot left to screw the handle to. So it proved…
[tl:movies size=486×412]
Check out the movement in the back wall of the van!
Rotten as a carrot
Anyone who has dealt with damp caravans before will know the tell-tale signs of trouble. The smell is the best indication. If it smells like compost, it’s rotten and no mistake. On that score, the Sprite was spot on. It smelt like a stable at mucking out time.
[tl:gallery size=460×310]
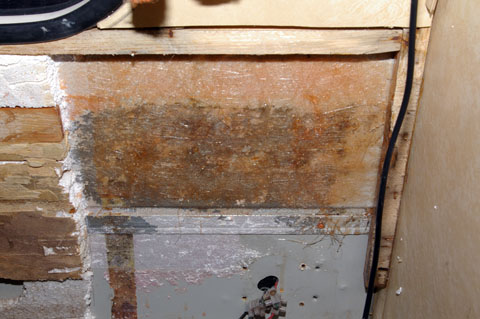
Dressing the aluminium flat is essential before taping it up and layering the waterproof GRP membrane behind it. Years of damp have made it paper thin.
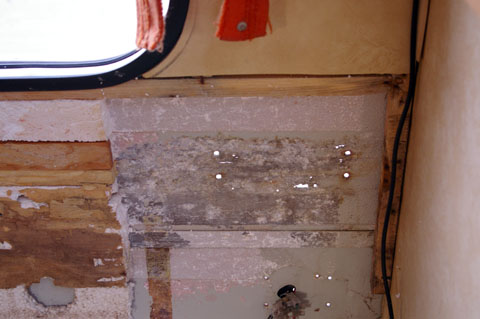
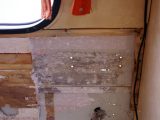
Next thing to look for is visible evidence. Staining of wallboard and external damage caused by water. Yes and yes. The rear panel had been replaced with a sheet of hardboard but was badly stained and mouldy and the rear grab handle fell off when pulled. Happily, stripping the furniture in a Sprite is simplicity itself and within 45mins of starting work, most of the interior was on my driveway.
[tl:gallery size=440×292]
The stained wallboard is a sure indication that water found a way in. The damage roughly lines up with the nearside rear grab handle which had fallen off.
Bang and clear
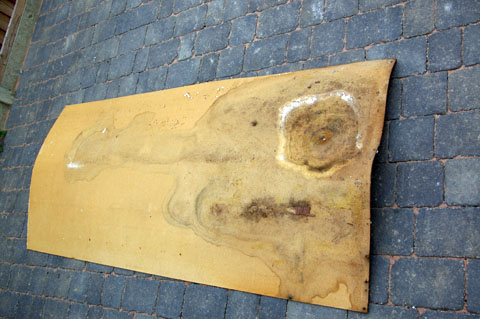
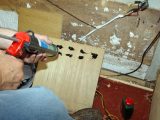
With the foam insulation and rotten wood stripped back, the water’s route in was clear to see. A common problem with caravans of this era is pinholing of the aluminium skin and our Sprite had a bad case of it. [tl:gallery size=440×292]
The light spots on the right side are holes. The cluster low down are for the rear lights but the upper ones are a mix of damage and grab handle mounts
No time to get downhearted though. Light wiring brushing of the back of the aluminium panel cleaned off all the loose rubbish and revealed a couple more little holes. With the area all clean, I went outside, put strips of Sellotape over all the holes. Back inside the van, I cut a sheet of chopped strand matting (CSM) to the correct size, mixed up glassfibre resin and painted the back of the holed panel. Then the CSM was laid over the affected area and coated up in resin. Within the hour, the glassfibre was dry and the next stage of the repair could begin.
[tl:gallery size=456×307]
The pinholed area was covered with a layer of glassfibre resin and CSM. It’s non-porous so and plugging the holes with GRP makes it waterproof again
We can rebuild him!
When repairing in damp in little old ladies like our Sprite, the idea is to keep the cost sensible and that means balancing the price of parts with the quality of the finished job. A piece of caravan wallboard costs nearly £100 whereas a sheet of hardboard costs a fiver and a roll of wallpaper that is nearly the same colour as a Sprite interior from Homebase is £8. In terms of the wall structure, we used 1/2in plywood. A 6×4 sheet was around £15 but that was enough to repair the damaged area and provide enough to repair a damaged table and provide a mount for a battery charger – more of which later.
Some areas of the rear frame were not damp damaged, but the staples holding the frame together had broken, stretched or otherwise seen better days. A couple of T-plates were screwed into position to reinforce the rear panel and two piece of plywood, bonded back-to-back made a very strong base to mount a grab handle. The ply was glued to the surrounding wooden frame with PVA wood glue, silicone was used to bond the ply to the aluminium panel and expanding builder’s foam was used to fill gaps elsewhere on the rear panel.
[tl:gallery size=460×310]
A mixture of silicone sealant, expanding foam and PVA woodglue was used to secure the rebuild plywood frame to the GRP-reinforced aluminium skin
Finishing off
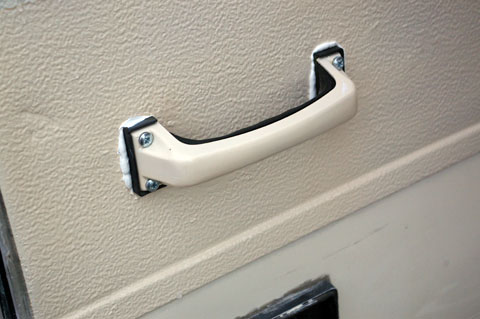
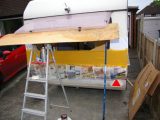
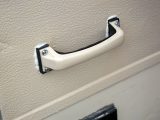
Although the work inside was taking shape, outside, things still looked a little sore. We had to concede that the only way to smarten things up was with a can of paint. Halfords doesn’t stock ‘Sprite White’ so a best guess was Ford Ivory from a circa 1988 Sierra. Isopon P38 filler was used to fill the pits in the outside of the panel and the glassfibre behind the wall ensured we weren’t smearing filler into the caravan. The result is not going to impress the local bodyshop, but after a coat of primer filler, with new screws and repainted grab handles, the result outside was more pretty good. Crucially, the grab handle is now strong enough to pull on to your heart’s content.
[tl:gallery size=460×310]I don’t have access to a spray booth, so my front garden, masking tape, an old newspaper and a couple of aerosols were the only option. Result is passable.
Inside, our sheet of hardboard was cut to size and bent delicately into position, following the curve of the van’s rear panel. The panel was marked to ensure we knew where to re-place the table mounting channel and then held in place by using heavy-duty staple gun. It already looked OK, but half an hour later with a roll of Homebase wallpaper, things really looked quite impressive. With the furniture replaced, the window rubber dressing the top of the panel and a piece of plastic dressing the joint between the old and new panels, we were pretty pleased with our day’s work.
[tl:gallery size=460×310]
The grab handle is now very firmly attached to the Sprite. Wiping off the excess sealant and resealing the rear light were the final jobs on the outside.
How much did it cost?
In total, the cost of the work (excluding our DIY labour) was £55
That breaks down as:
Silicone sealant – £5
8×4 hardboard sheet, self-tapping screws – £8
Filler, primer and paint from Halfords – £19
Roll of wallpaper and ready mixed paste from Homebase – £14
Expanding builder’s foam and instant-grab adhesive from Wickes – £9
Total cost of materials – £55
Bearing in mind that a lot of caravan workshops quote as much as £100 per square foot for damp repairs, our five sq ft repair looks good value. And a £500 repair on a caravan that cost £380 would have been very hard to justify to Mrs Donnelly!