
Caravans stand on their wheels and jockey wheel, with four wind-down legs to keep them steady. As such, so long as your touring pitch is reasonably flat, or at least not on a steep incline, you will be able to adjust your van to make it completely flat – otherwise known as levelling a caravan.
A level caravan allows the drainage system and the fridge to work properly when you’re pitched up at one of the best caravan sites, and you won’t be climbing into bed, only to discover your feet rather disconcertingly higher than your head!
Caravan levelling is a basic skill, but many people seem to be confused by the procedure. Here, I’ll explain how to level a caravan, in a simple step-by-step way, as well as taking a look at the other options you could consider, such as a caravan self-levelling system.
You can also use the list below to navigate to a particular section.
Practical Caravan is supported by its audience. When you purchase through links on our site, we may earn an affiliate commission. Learn more
Levelling a caravan – everything you need to know:
Caravan levelling – the basics
Kit required to level a caravan
How to level a caravan
Levelling a twin-axle caravan
Tips and tricks to help you with levelling a caravan
Other caravan levelling options
Caravan levelling – the basics:
What is caravan levelling?
It’s fairly obvious that you want the floor of your caravan (and therefore the bed, settees, tables and shower) to be level, or as close as possible to it.
The handbasin, sink and shower drains, and the waste pipe system, are designed to function properly when the caravan floor is flat. Any significant tilting can prevent proper drainage, and you could end up with water pooling in the shower tray, the basin and the sink.
Steadies are not for levelling
Caravan corner steadies are not designed to take the stresses and strains involved in levelling a caravan. They are meant to be lowered to the ground to prevent an already level tourer from rocking or wobbling as you move around inside.
Although it can be tempting to make fine levelling adjustments by giving the corner-steady screw a couple of extra turns, the twisting forces can cause panel joins to part, sealant to split, composite floor layers to separate, or, worst-case, the floor to crack. Avoid at all costs.
What do I need to achieve when levelling my van?
Caravans have to be level in two planes: laterally, from side to side, and longitudinally, along the length of the van. Get this right and everything will function perfectly.
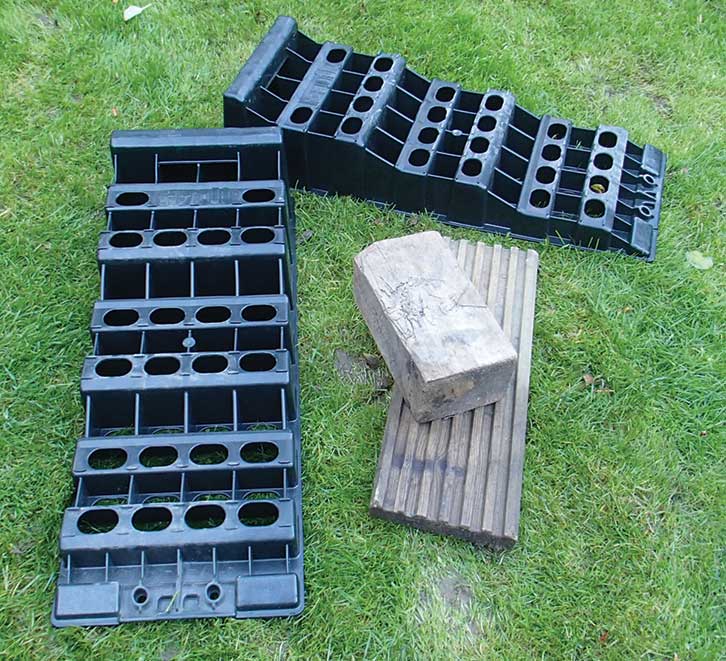
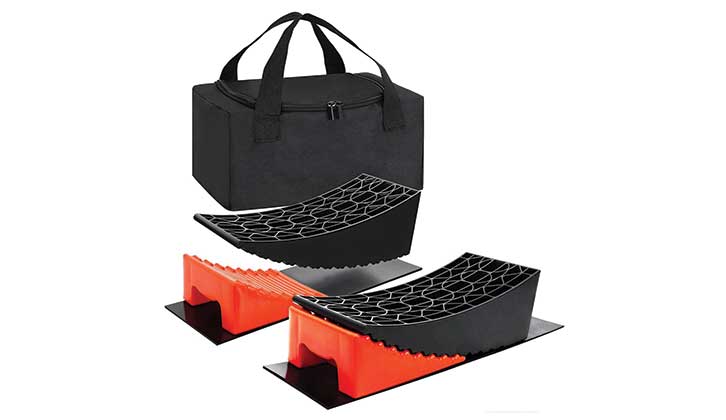
Kit required to level a caravan
When you’re kitting out a caravan, you’ll want to ensure you have these items packed to enjoy a level tourer:
- Spirit level – traditional or an app-based version
- Levelling ramps
- Chocks
- Blocks
Spirit level
First, you’ll need a spirit level – either a traditional one with a real bubble, or an app-based version that is stored on your digital device.
If you’re levelling the van alone, a digital option can minimise the legwork involved, because they emit a beeping sound which tells you when it is level. This saves you having
to run in and out of the caravan, probably cursing and sweating!

I use a phone app called Bubble Level HD, which is pretty good, but it does have ads on it – and the ‘bing’ sound can get a bit annoying after a while. Other digital spirit level apps include Spirit Level Tool – Digital; Pocket Bubble Level; Stanley Level and Bubble Level – Spirit Level. All of these are free to download.
Of course, you could remain old-school and just use a traditional spirit level… along with some traditional shouting: “I said up, not down!” Whatever you use, you want to get the bubble in the middle to denote that the caravan is level.
Levelling ramps
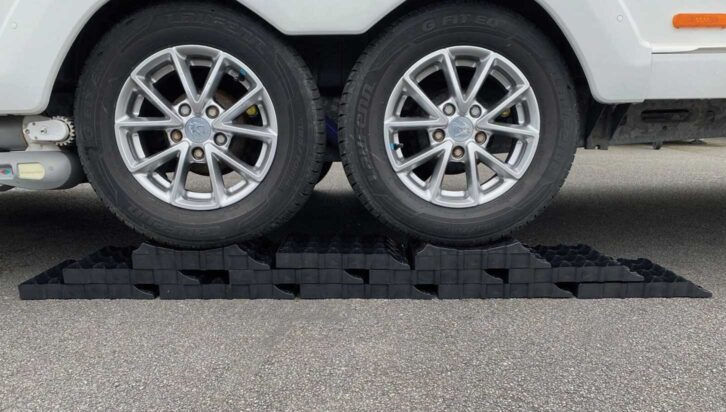
Levelling ramps are a caravan essential if you camp anywhere other than on perfectly level pitches. Typically, these 2ft-long ramps are made from heavy-duty, super-tough plastic and can raise either side of your tourer up to four or six inches when you pull the wheel of your caravan onto them. How far you pull the van onto them will dictate how high that side of the tourer is raised.
Chocks
On any sloping pitch, we would always recommend using chocks to eliminate the chances of your van rolling away. These are positioned tightly behind the wheel on the lower side, and prevent the wheel from moving if the brakes should fail. Once on your ramp, also add a chock behind the raised tyre. Some ramp kits include chocks that clip into the ramp.
Blocks
For really sloping pitches, it’s a good idea to take a few wooden blocks with you, too, in case the steep gradient that you’re on means that one or more of your steadies won’t reach the ground.
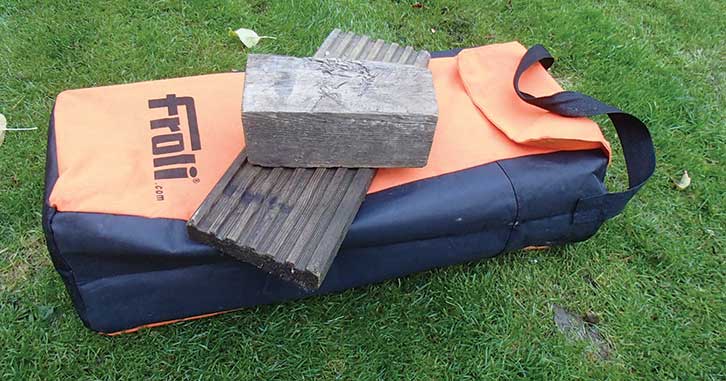
I always carry a 4in block of wood and several short lengths of grooved decking board. These also help to spread the load if the ground is particularly soft.
Now you know the kit you’ll need, here’s what to do…
How to level a caravan
1. Start by assessing the pitch and plan where you want the caravan to be positioned on it – ideally in as flat a position as possible.
And if there is a slope, it will make levelling easier if the van is positioned with the incline aligned longitudinally along the length of the caravan, rather than across the van.
When pitching your van, take into consideration where the sun will be during the day, and particularly in the evening (in summer); the view; any sloping of the pitch or high and low spots; which way you want the door to open and where the awning (see: the best caravan awnings if you’re after one) will fit. In addition, consider if there are any trees across your pitch and the proximity of your neighbours.
2. Once you have earmarked your perfect spot, tow the caravan into position. On many pitches, this will be a reversing manoeuvre, while on open-field style campsites, you might be able to loop around and drive through the pitch until the caravan is in position.
3. With the former, reverse the van about 60cm (2ft) further back than your final preferred position. Stop the car, apply the handbrake and leave it in first gear or Park for good measure.
4. You should level laterally first, so jump out with your spirit level and check the caravan’s general stance, laterally, from side to side.
I do this by placing the spirit level horizontally across the caravan, on the floor (I tend not to use the A-frame cover or the front console, which might seem easier). Then, check which side of the van needs to be raised.
5. As an example, let’s assume your single-axle tourer is noticeably lower at the nearside than the offside. It’s lower by several inches – which is certainly enough to make sleeping in your transverse bed a bit of a head-spinning experience!
6. Now, leaving your spirit level positioned laterally across the middle of the floor inside the van door, grab your levelling ramps and place one of them just in front of the nearside caravan wheel.

7. If you have somebody to help you by keeping an eye on the bubble, wind down your car window, so you can hear their instructions. In the past, we’ve even communicated using our mobile phones.
8. Now slowly drive the tow car forward, or use the motor mover (see our guide to the best caravan motor movers if you need one), so that the caravan wheel moves up the ramp. Your levelling partner can tell you when the bubble is centred. Stop immediately and apply the tow car handbrake.
IMPORTANT!
I always avoid reversing a caravan up the ramp, because the autoreverse system will deactivate the brake mechanism until the caravan is moved forward again. This means the van may roll down the ramp a little before the brakes take effect.
In addition, by reversing on, the drawbar will be compressed, so you will have to pull forward to unhitch. Of course, you can chock the wheel before pulling forward, but that’s going to involve more hassle.
9. If the caravan has remained level, apply its handbrake and place a chock behind the raised wheel. Then rechock the other wheel, to prevent the van rolling backwards. You are now ready to level longitudinally.
10. Unhitch the tow car and park it. The caravan is now sitting on its two wheels and the jockey wheel.
11. Turn the spirit level laterally, so it runs end-to-end along the van.
12. Now, simply wind the jockey wheel up or down, until a level stance is achieved end-to-end.
If you use a digital spirit level on your phone, open the front window and you will hear it beep to tell you that the caravan is level.
13. With your caravan level in both planes, lower your corner steadies so they are making firm contact with the ground. Job done!
Levelling a caravan on your own
If you are levelling up on your own, step 9 is a bit trickier. You’ll need to pull the van some way up the ramp, stop, apply the tow car handbrake, then check the spirit level and manoeuvre the van accordingly. You might have to repeat this process several times until the caravan is level.
Using a motor mover to level a caravan
Motor movers take some of the hassle out of solo levelling – you can watch the spirit level as you ‘drive’ the van with the mover.
Levelling a twin-axle caravan
Levelling a twin-axle caravan will obviously complicate matters a little, because both wheels/axles on the lower side will need to be raised. There are several ways to do this.
The two-ramp technique
For twin-axle caravans, using two ramps, you can replace step 9 with this technique.
As most ramps are too long to slide in between the two wheels, I line up both ramps ahead of the front wheel and slowly pull forward.
The front wheel rolls up the first ramp and slowly over the top, dropping onto the lower edge of the second ramp.
Meanwhile, the rear wheel is on the lower edge of the first ramp. Now, as you drive forward, both wheels rise in tandem on their respective ramps.
Some levelling ramps feature a gentle gradient, rather than an abrupt drop from their highpoint. These might be better for levelling twin-axle caravans using the technique described above.
Milenco Stacka 9 Level Set
Use layers of slim Milenco Stacka blocks to create a level, raised platform, onto which you can tow your tourer.
Stackas are extremely strong and robust blocks, which interlock and can be built up to the required height for levelling. Simply stack the pieces to the desired level, with the Tyre Saver block at the top.
The height is variable, ranging from one to three blocks, plus the Tyre Savers.
Andersen Levelling Ramps
These curved levelling ramps are really clever, because their bowed design allows you to squeeze one in between the two wheels on most tourers.
Place one ramp in front of the forward wheel and the second between the two tyres, for the rear wheel to roll onto.
As you slowly manoeuvre the caravan forward, the ramps will roll down and the van wheels will climb the slopes.
Once at the correct height, place the chock under the raised end of the ramp and let the van roll back a few inches.
Tips and tricks to help you with levelling a caravan
Levelling a caravan on an extreme slopes
On extreme slopes, you should take extra care to ensure the caravan is stable, braked and chocked. You may need blocks to lower your jockey wheel and corner steadies onto, if they don’t reach the ground when they have been fully extended.
Always take care that the rear end of the van, which is positioned uphill, does not hit the ground when the van is levelled.
Lazy levelling
A few years ago, we finally arrived at our beachside campsite on Ile de Ré, in France, very late in the day, after encountering some major traffic jams.
We couldn’t get in at first, until a kind camper zapped us through the barrier, where we found a note about our pitch details stuck to the office door.
By the time I got to levelling, I was exhausted, so instead of dragging the ramps out to raise one side of the van, I simply scooped a small hollow in the sand in front of the other wheel and towed the van into it. Lazy, but effective!
Always remember…
Take your time, be patient and always make gradual adjustments when manually levelling your caravan. Proper levelling not only ensures your comfort, but also contributes to the safety and stability of your van during your trip. Always ensure your levelling partner is positioned safely and understands what you are about to do.
If you feel like you’d benefit from some training to help you master it, it’s offered in the Caravan and Camping Club’s caravan towing tuition too.
Other caravan levelling options
LocknLevel
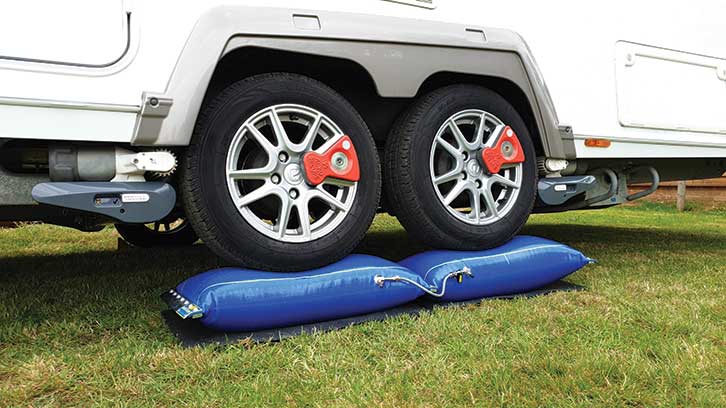
LocknLevel is a popular airbag device, which allows you to elevate your caravan wheels, together or independently, with the minimum amount of hassle.
Its tough nylon-reinforced polypropylene bags weigh in at 4kg in single-wheel format and 7kg for twin-axles.
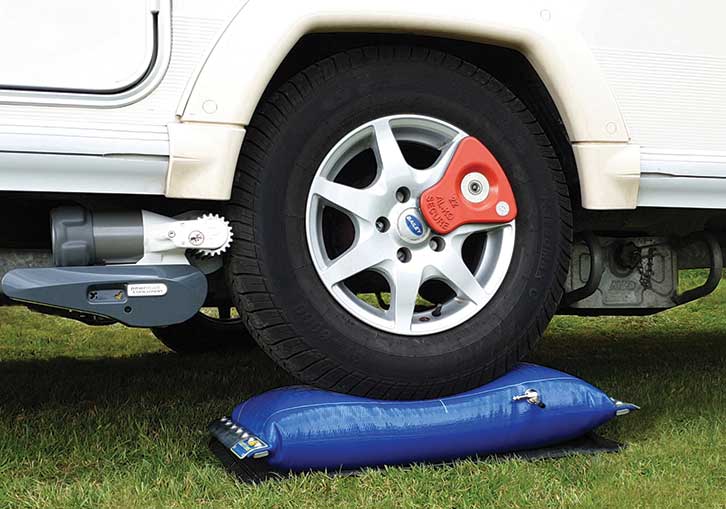
To use one, you simply place it on the ground in front of, or behind, your caravan wheel and manoeuvre the wheel into the centre of the deflated airbag.
Then you pump it up. We recommend using a compact electric car-tyre pump.
LocknLevel can raise a caravan up to 15cm (6in), depending on its weight, and has a maximum 30psi (2 bar) pressure rating.
How to use LocknLevel:
1. On gravelly pitches, where a sharp stone could puncture the LocknLevel, consider placing a length of board (cut to size) underneath your airbag.
2. Note where the wheels will be when your tourer’s in the ideal position on your pitch. Now manoeuvre the caravan to just in front of, or behind, that point.
3. Place your LocknLevel in the ideal position, in front of or behind the caravan wheel(s), with the valve system facing outwards, so it is accessible.

4. Now, either towing or using your motor mover, slowly manoeuvre your tourer onto the deflated LocknLevel.
5. Ensure that the caravan wheels are between the yellow lines, and the two yellow dash lines align with the hub centre of the front or rear wheel (depending which side you’re raising).
6. Apply the caravan handbrake, and chock the wheels that aren’t being raised at this point.
7. Fix your car tyre pump to the LocknLevel inflation valve.
8. If you simply want to raise one side of the caravan to achieve a level stance, with a twin-axle van, turn the LocknLevel valves so that both of the airbags inflate at once.
9. If you want to raise just one wheel on your twin-axle van, for example to fit an Al-Ko wheel lock, you’ll need to turn the isolator switch on the valve system to the appropriate position, to inflate one of the airbags.
10. Turn on your pump to inflate the LocknLevel. To pump up one airbag takes three to five minutes, depending on your pump. To inflate a double airbag, allow seven to 10 minutes.
11. Check the spirit level as the bag inflates, and stop pumping when the caravan achieves a flat stance.
12. Remove the pump. Your caravan should now be level, although you can tweak the height by adding more air or letting some out. If, over a period of time, you think that the caravan has sunk, simply top up the airbags.
13. To deflate the LocknLevel, you just need to open the valve. You can now tow your caravan off the airbags.
There are several other benefits of using LocknLevel. The airbag system allows you to raise the caravan when you can’t reach the jacking points because of motor mover fittings. LocknLevel will also make it much easier for you to fit Al-Ko wheel locks on a twin-axle caravan. Without the airbag, it can be tricky to align the lock receivers with the gaps in the wheel ‘spokes’.
LocknLevel costs from £170 for a single-axle system, and from £200 for a twin-axle, double-bag set-up
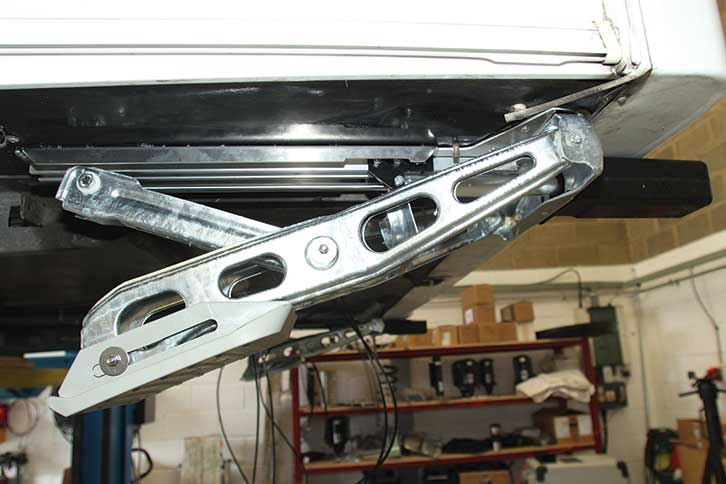
Auto-levelling
An increasing number of auto-levelling systems are available in the UK caravan and leisure vehicle market.
These ingenious hydraulic systems use automated jacks and corner steadies to take all of the mental and physical effort out of the levelling process.
Simply park your tourer on its pitch, then, at the touch of a button, powered rams and the corner steadies drop down in sequence beneath it, elevating the lower side until the unit is dead-level and fully stabilised. This takes just two minutes.
Some systems only level side-to-side, leaving the caravanner to do the easy bit, winding their vehicle level end-to-end, using the jockey wheel handle. The E&P Level C Compact system works this way. It costs £2450 and weighs 20kg.
For a set-up that handles all aspects of caravan levelling, take a look at E&P’s Level C system. It weighs 25kg and costs around £3750. Both of these prices include installation and VAT. These systems use 12V battery power, so can be used off-grid.
While E&P systems feature a central hydraulic pump that serves all four corner steadies, Al-Ko’s HY4 takes a different approach, with a pump for each steady.
It weighs 68kg, which makes it a heavy choice for caravanners. The entry-level HY2 (serving two steadies) weighs 34kg.
Other brands with products in the auto-levelling market include Lippert and a company called Amplo. Don’t forget to factor in the impact this may have on your caravan weights though.
If you’re new to touring and want some general guidance as well, our beginner’s guide to caravanning outlines everything you need to know. If you’re picking up a new tourer soon, don’t miss our guide to what to expect when you’re collecting a caravan either.
Further information
Future Publishing Limited, the publisher of Practical Caravan, provides the information in this article in good faith and makes no representation as to its completeness or accuracy. Individuals carrying out the instructions do so at their own risk and must exercise their independent judgement in determining the appropriateness of the advice to their circumstances and skill level. Individuals should take appropriate safety precautions and be aware of the risk of electrocution when dealing with electrical products. To the fullest extent permitted by law, neither Future nor its employees or agents shall have any liability in connection with the use of this information. You should check that any van warranty will not be affected before proceeding with DIY projects.
If you’ve enjoyed reading this article, why not get the latest news, reviews and features delivered direct to your door or inbox every month. Take advantage of our brilliant Practical Caravan magazine SUBSCRIBERS’ OFFER and SIGN UP TO OUR NEWSLETTER for regular weekly updates on all things caravan related.