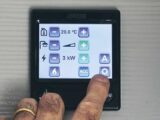
In these days of soaring energy prices, we’re all trying to keep our expenditure down. Most of us are feeling the pinch, especially in the colder months. In your caravan, the biggest consumer of energy is probably the space and/or water heating. As well as the cost, leaving the heating system on all the time isn’t very ‘green’, either.
A few years ago, Alde brought out its Smart Control system, later superseded by the Truma iNet – which worked excellently with the Alde set-up.
I have used both to great effect, but these days, sadly, neither system is available.
Timing your Alde heating
So without those units, the only answer seems to be turning off the heating when you go out for the day and leaving it off until you return, meaning that your caravan might be rather chilly and unwelcoming if the outside temperature is very cold.
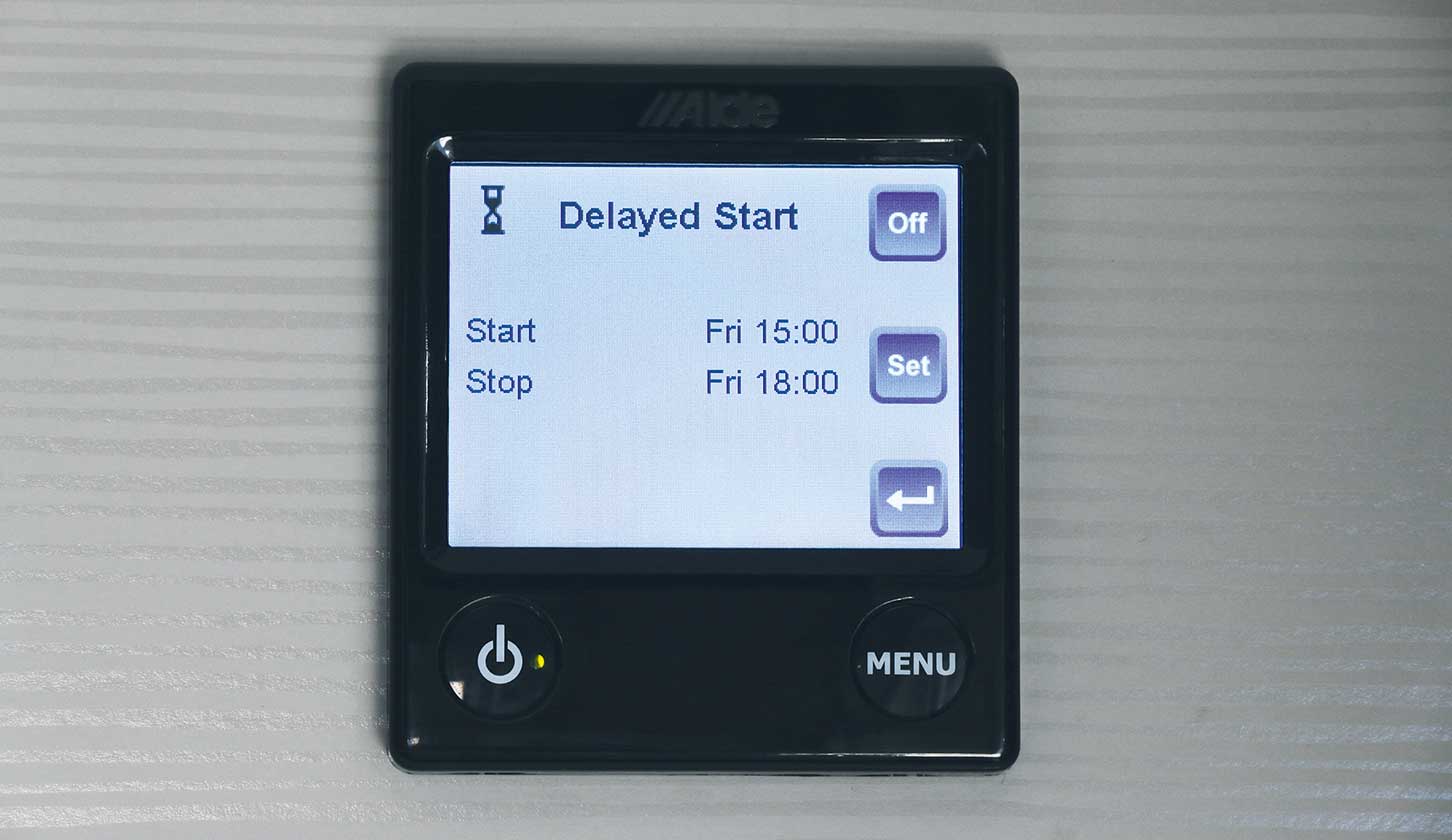
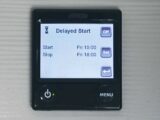
Or is it? If you have the Alde 3020 boiler and control panel in your van, there’s a little-known feature, called Delayed Start. You can also set Delayed Start on your Alde 3030 boiler too.
I will be perfectly honest here and admit that I was unaware of this until a couple of months ago, when Alde contacted me and told me about the Delayed Start for my heating.
How does it work? It’s simple – you pre-set the heating system to start at a chosen time, then turn off the heating when you leave for the day. I’ll show you how to set the function, then turn it off again on your return.
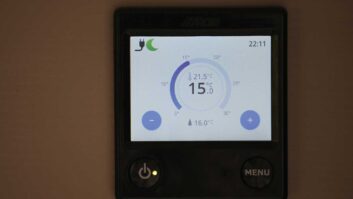
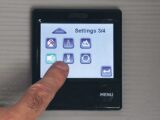
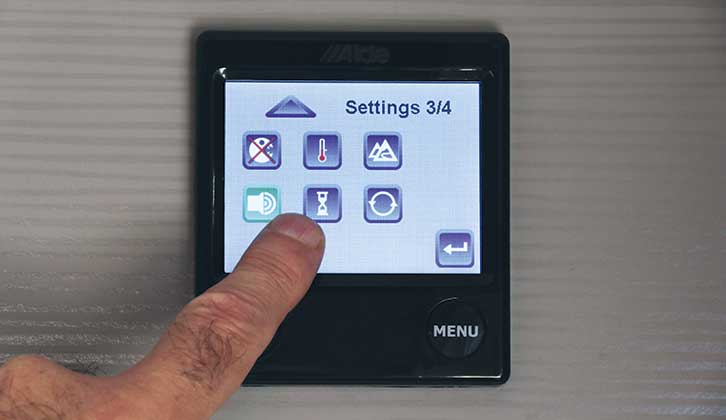
With your system operating, begin by pressing the Menu button. Next, tap the Settings icon (bottom right-hand corner of the screen), which takes you to page 1 of 4 in the Settings menu. By touching the ‘down’ arrow icon at the bottom of the screen, scroll down to page 3.
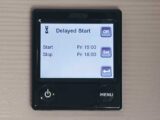
The Delayed Start icon is the Hourglass (bottom row in the centre). Touch the Hourglass and the screen will display the Delayed Start menu.
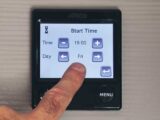
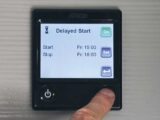
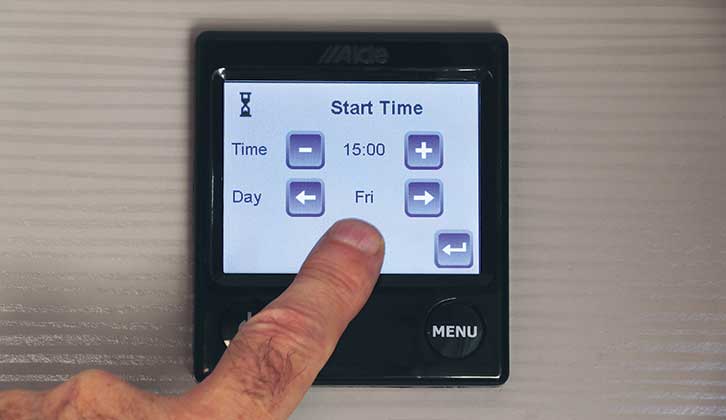
Next you need to set the Start Time and Day, so touch the Set icon. Then set the Start Time to an hour or so before you expect to return, to give the system time to warm up.
For example, if you intend returning around 4pm, set the Start Time for 3pm. Then check that the Day corresponds with the day you want it to start.
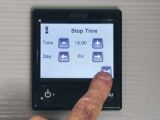
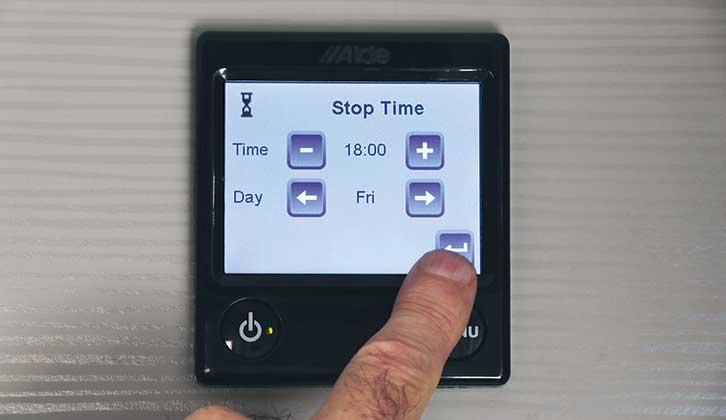
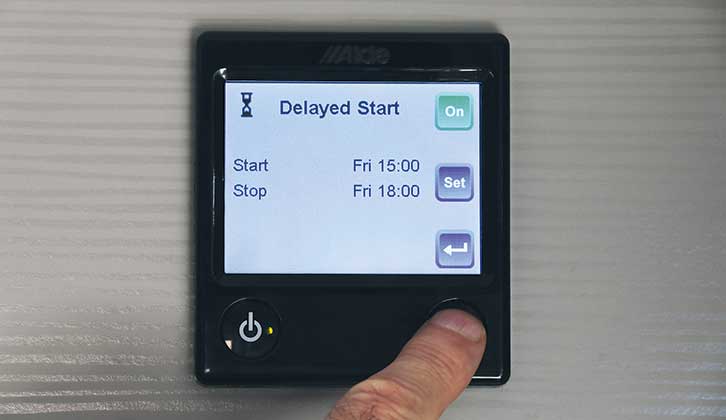
Now touch the Return icon at the bottom right of the screen, which will take you to the Stop Time. Set that to an hour or so after you intend to return from your outing, so if you’re a little later than planned, the heating will still be on (of course, you could set the Stop Time much later, it makes no difference). With that established, touch the Return icon and you’ll go back to the Delayed Start menu page. At the top right of that page, you’ll see the blue Off icon. Touch that, so it turns green and says On. Press the Menu button twice to return to the Home screen.
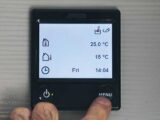
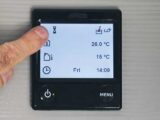
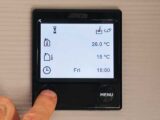
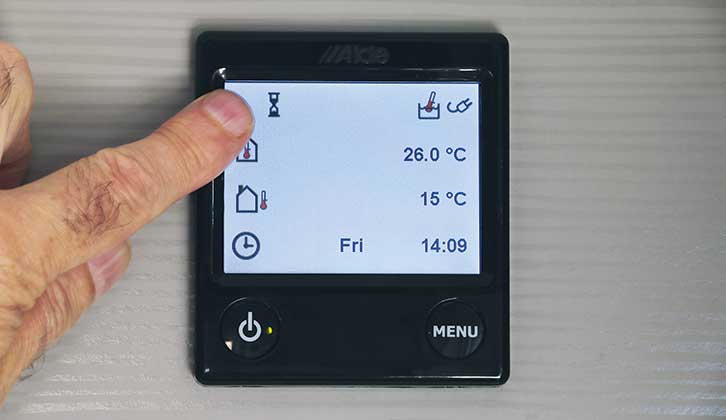
On the Home screen, you’ll see the Hourglass icon at the top. This tells you that you have set the times for the Delayed Start function, but the system is still operating to your default settings (chosen temperature and water heater on).
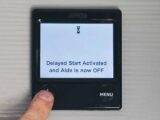
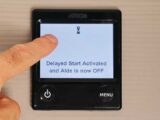
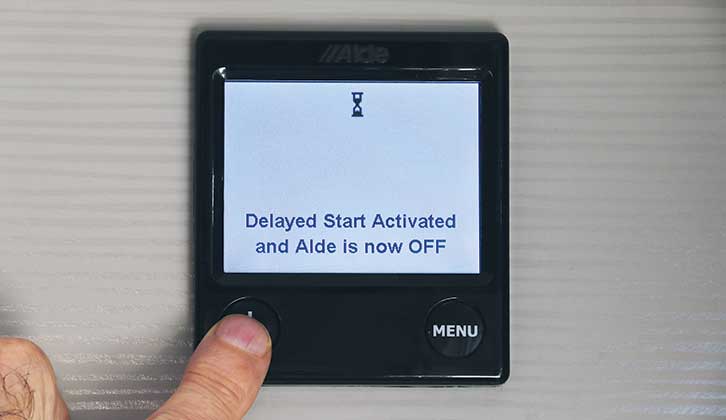
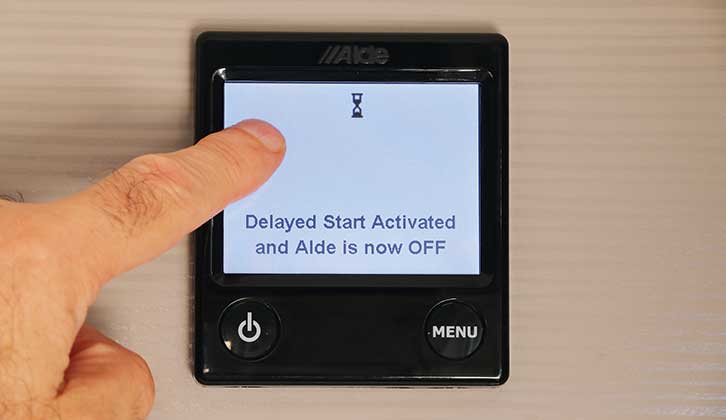
When you leave the van, turn off the heating using the main On/Off switch on the control panel. When you do that, before the screen goes fully off, you’ll see the message ‘Delayed Start activated and Alde is now off’. You can check the status of the system at any time – simply touch the screen anywhere and you’ll see the message.
All set! You can now go out and enjoy your day, knowing that you’re doing your bit for the environment – and saving yourself/the campsite owner a bit of money, too.
But when you return to the van later on, there will be a few more steps to take, because left as it is, the Delayed Start will continue to function on every selected time and day, unless
it is cancelled.
- If the bright white light of the panel is keeping you awake, our guide to how to invert an Alde control screen will help.
Switching off
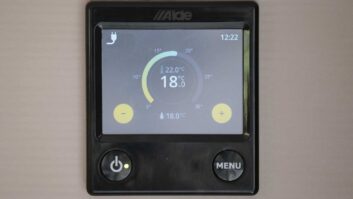
When you return to your van, and assuming that it’s within the timespan you selected for the Delayed Start, press the main On/Off button, and you’ll see the message ‘Delayed Start activated and Alde is now on’.
Note that if you’re outside those times, you’ll see a similar message, saying ‘Delayed Start activated and Alde is now off’.
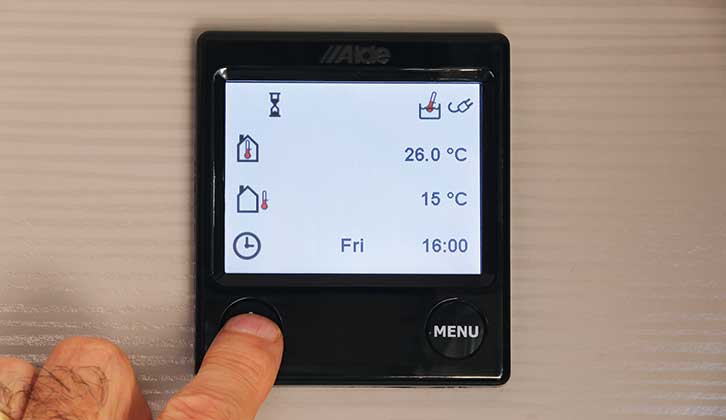
Then you’ll see the Home screen, with the Hourglass icon displayed, showing that the Delayed Start is still set.
Press the Menu button and then touch the Settings icon. As described previously, navigate to the Delayed Start menu. To turn the function off, simply touch the green On icon at the top right, so that it turns blue and says Off. Press the Menu button twice to return to the Home screen and your default settings.
And that’s it. At first, it might seem complicated, but once you’ve used this a few times, it becomes second nature.
An Alde back-up battery is a great accessory to the system, because it maintains the clock settings should power to the system be lost or turned off. If that does happen, all of the timed settings will be lost, including the Delayed Start.
- If you’re looking for a way to keep warm on tour, be sure to take a look at our best caravan heater round-up too, where we share our top picks on the market.
A step-by-step guide to setting your Alde heating to delayed start
1. Begin by pressing the Menu button.
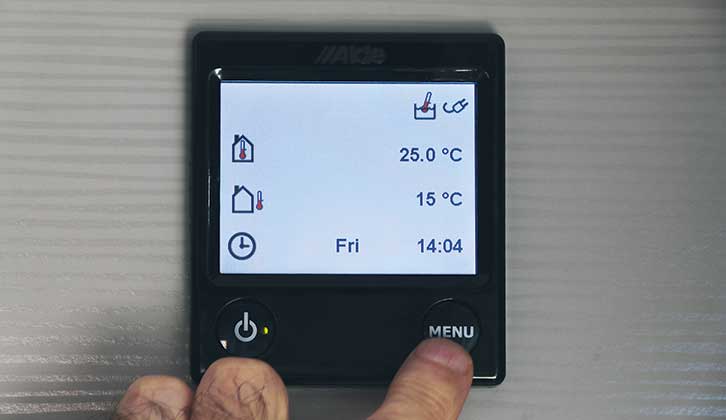
2. Next, touch the Settings icon.
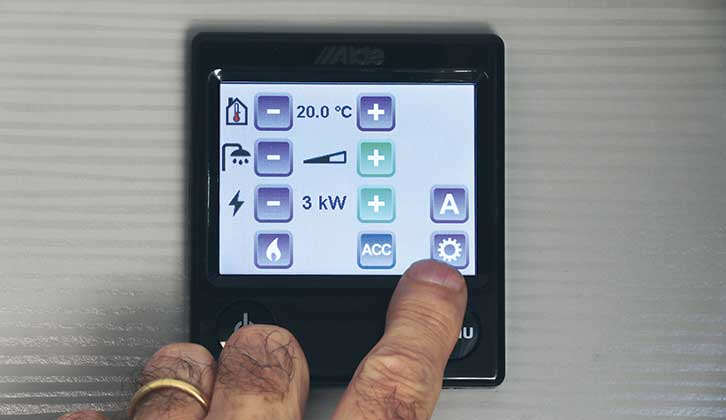
3. Scroll down to page 3 of the settings, where the Delayed Start icon is the Hourglass.
4. Tap the Hourglass for the Delayed Start menu.

5. Set Start Time and check the Day is correct.
6. Touch the Return icon, set the Stop Time and check once more that Day is correct.
7. Touch the Off icon, so that it turns green and displays On, then press Menu button twice to return to the Home screen.
8. The Hourglass icon will now be displayed on the Home screen, indicating that the Delayed Start function has been set.
9. Press the main On/Off button to turn off the heating, and you’ll see the message ‘Delayed Start activated and Alde is now off’.
10. The screen will go off, but you can check the system’s status at any time by simply touching the screen.
11. After returning to your caravan, turn on the heating by using the main On/Off switch.
12. Navigate to the Delayed Start menu page and turn off the function by touching the green On icon, so that it turns blue and says Off.

After more DIY projects? Then why not try these:
- We talk you through how to replace a jockey wheel.
- In this guide, we explain how you can brighten your caravan awning light.
Future Publishing Limited, the publisher of Practical Caravan, provides the information in this article in good faith and makes no representation as to its completeness or accuracy. Individuals carrying out the instructions do so at their own risk and must exercise their independent judgement in determining the appropriateness of the advice to their circumstances and skill level. Individuals should take appropriate safety precautions and be aware of the risk of electrocution when dealing with electrical products. To the fullest extent permitted by law, neither Future nor its employees or agents shall have any liability in connection with the use of this information. You should check that any van warranty will not be affected before proceeding with DIY projects.
If you’ve enjoyed reading this article, why not get the latest news, reviews and features delivered direct to your door or inbox every month. Take advantage of our brilliant Practical Caravan magazine SUBSCRIBERS’ OFFER and SIGN UP TO OUR NEWSLETTER for regular weekly updates on all things caravan related.